Overview
A number of people have asked me how to use Tableau to visualize survey data that was captured using Google Forms. I decided to try this for myself and built a pre-course survey where I asked folks that were going to attend one of my classes about their experience with survey tools and Tableau. A snippet of that survey is shown below.

Figure 1 — A piece of a survey built using Google Forms.
The good news is that with Google Forms you can get the data mostly “just so.” The bad news is that the data is only recorded as text responses and that check-all-that-apply questions are not placed in separate columns, but are instead smashed together in a single column with a semi-colon as a delimiter.
In this blog post we will explore how to convert the check-all-that-apply responses into separate columns that have 1 for respondents that selected an item and 0 for those that did not. Note that this technique will work for any tool that doesn’t place the responses in separate columns.
Inspecting the data
Note that the survey I constructed only had a few questions so I’m not bothering to create a “helper” file and I’m not wringing my hands that I can only get the data as text responses instead of both text and numerical responses. (If you’re not sure what those things are, see this blog post.)
Here’s the CSV file I downloaded from Google Forms. I’ve highlighted the check-all-that-apply responses.

Figure 2 — The CSV file from Google Forms.
Notice that we can’t count on certain selections being in the same place within the cell. For example, in row two, the first tool selected is “Qualtrics” while in rows 3 through 5 the first is SurveyMonkey.

Figure 3 — We can’t count on the there being a uniform number of elements or that the first element will always be the same.
So, how can we take that “mess” in column D and create separate columns for the eight possible options?
It turns out this is easy to do with Tableau Prep.
Don’t know how to use Tableau Prep for survey data? Click here.
Converting the single columns into many columns
Here’s what the data looks like inside Tableau Prep

Figure 4 — Our Google Forms data inside Tableau Prep.
We need to create several new calculated field based on the field [What survey tool(s) do you use]. To do this, we right-click that field and select Create Calculated Field from the context menu.

Figure 5 — Creating a new field based on another field.
Below we see a new field called [_Qualtrics] that is defined as follows.

Figure 6 — Creating a new field that counts how many people selected Qualtrics.
Here’s the English translation:
If the field [What survey tool(s) do you use?] contains the
word “Qualtrics”, put a 1 in the new field called [_Qualtrics];
otherwise, put a 0.
And guess what? We get to do this again for each of the eight different options for the check-all-that-apply question. Here’s what the [_SurveyMonkey] field looks like:

Figure 7 — Creating a new field that counts how many people selected SurveyMonkey.
Here’s what the step looks like with the 8 new calculated fields.

Figure 8 — Creating eight check-all-that-apply fields from Google Forms
Note: I’m using the underscore in the field name to make it easier to find and group all the check-all-that-apply questions.
Reshaping and outputting the data
Now that we’ve converted that one column into eight columns, we need to take all the non-demographic questions and reshape them so that we have two columns (one named Questions and the other Answers).

Figure 9 — Reshaping (pivoting) the data.
We leave the Timestamp and Username intact (1) and pivot everything else, renaming Pivot field names as Questions (2) and the Pivot field values as Answers (3).
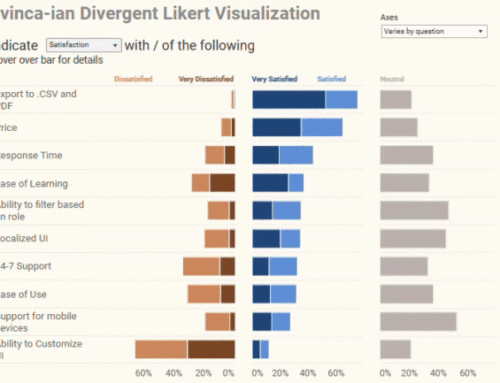
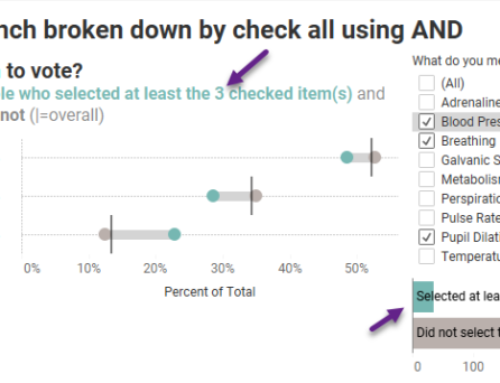
We can now output this to a .hyper file and visualizing our check-all-that-apply question in Tableau.

Figure 10 — Visualizing a Google Forms check-all-that-apply question in Tableau.
Want the source data as well as the Tableau Prep flow file? Click here to download the packaged Tableau Prep file.